이 글에서는 kube-prometheus-stack을 설치한 후 기본 설정을 이해하고 다양한 커스터마이징 방법을 알아봅니다. Prometheus, Alertmanager, Grafana 등 주요 컴포넌트별 구성 파일 위치와 수정 방법을 살펴보고, 모니터링 대상 추가, 알림 규칙 설정, 보안 강화 등 실무에 필요한 커스터마이징 테크닉을 다룹니다. 이를 통해 조직의 요구사항에 맞게 모니터링 시스템을 최적화할 수 있습니다.
📌 kube-prometheus-stack 기본 설정 이해하기
kube-prometheus-stack이 설치된 후 기본 구성과 설정 파일들을 이해하는 것이 중요합니다.
✅ 구성 요소 및 배포 상태 확인
설치된 모니터링 스택의 컴포넌트와 상태를 확인합니다:
# 네임스페이스의 모든 리소스 확인
kubectl get all -n monitoring

# 사용자 정의 리소스 확인
kubectl get prometheuses,alertmanagers,servicemonitors,podmonitors,prometheusrules -n monitoring

# 공통 레이블 확인 (필터링에 유용)
kubectl get all -n monitoring -l app.kubernetes.io/part-of=kube-prometheus-stack
✅ 설정 저장 방식 이해
kube-prometheus-stack의 설정은 다양한 쿠버네티스 리소스에 저장됩니다:
- ConfigMaps: 대부분의 설정 데이터
- Secrets: 암호 및 인증 정보
- CRDs (Custom Resource Definitions): 선언적 구성
# 설정 관련 ConfigMap 확인
kubectl get configmap -n monitoring -l app.kubernetes.io/part-of=kube-prometheus-stack

# 설정 관련 Secret 확인
kubectl get secret -n monitoring -l app.kubernetes.io/part-of=kube-prometheus-stack

# 특정 ConfigMap의 내용 확인
kubectl get configmap prometheus-server-conf -n monitoring -o yaml
✅ Helm 값 확인
현재 적용된 Helm 차트 값을 확인할 수 있습니다:
# 현재 설치된 릴리스의 값 확인
helm get values prom-stack -n monitoring
▶️ 설정 이해 팁: kube-prometheus-stack의 모든 기본 설정은 GitHub 레포지토리에서 확인할 수 있습니다. values.yaml 파일을 참조하면 모든 가능한 설정 옵션을 이해하는 데 도움이 됩니다.
📌 Prometheus 설정 커스터마이징
Prometheus 서버의 구성을 필요에 맞게 커스터마이징하는 방법을 알아봅니다.

✅ Prometheus CR을 통한 기본 설정
Prometheus Custom Resource(CR)를 통해 Prometheus 서버의 대부분의 설정을 관리할 수 있습니다:
# 현재 Prometheus CR 확인
kubectl get prometheus -n monitoring -o yaml
# prometheus-custom-values.yaml
prometheus:
  prometheusSpec:
    # 서버 복제본 수 - 고가용성을 위해 2개 이상 설정할 수 있음
    replicas: 1

    # 메모리 관리 설정 - Prometheus 컨테이너의 리소스 요청 및 제한 설정
    resources:
      requests:
        memory: 1Gi  # 최소 1GB 메모리 요청 (메트릭 볼륨에 따라 조정 필요)
        cpu: 500m    # 0.5 CPU 코어 요청
      limits:
        memory: 2Gi  # 최대 2GB 메모리 제한
        cpu: 1000m   # 최대 1 CPU 코어 제한

    # 샘플 관리 설정 - 메트릭 수집 주기 및 타임아웃 관련 설정
    scrapeInterval: 30s  # 기본 스크래핑 간격 (모든 타겟에 적용)
    evaluationInterval: 30s  # 규칙 평가 간격 (알림 규칙 확인 빈도)
    scrapeTimeout: 10s  # 스크래핑 타임아웃 (너무 길면 리소스 낭비, 너무 짧으면 타임아웃 발생)

    # 데이터 보존 정책 - 메트릭 저장 기간 및 용량 설정
    retention: 15d  # 데이터 보존 기간 (15일)
    retentionSize: 30GB  # 최대 스토리지 크기 (선택적 설정, 이 크기 초과 시 오래된 데이터부터 삭제)

    # 쿼리 제한 설정 - 쿼리 성능 및 안정성 관련 설정
    query:
      maxSamples: 50000000  # 쿼리당 최대 샘플 수 (메모리 사용량 제한에 중요)
      timeout: 2m  # 쿼리 타임아웃 (복잡한 쿼리의 최대 실행 시간)
      lookbackDelta: 5m  # 룩백 델타 (rate() 같은 함수의 기본 룩백 기간)

    # 외부 레이블 - 모든 메트릭에 자동 추가되는 레이블 (다중 클러스터 구분에 유용)
    externalLabels:
      cluster: "production"  # 클러스터 식별자
      environment: "prod"    # 환경 식별자

    # 셀렉터 설정 - 어떤 ServiceMonitor, PodMonitor 등을 스크래핑할지 결정
    serviceMonitorSelector:
      matchLabels:
        prometheus: prom-stack  # 이 레이블이 있는 ServiceMonitor만 선택

    podMonitorSelector:
      matchLabels:
        prometheus: prom-stack  # 이 레이블이 있는 PodMonitor만 선택

    ruleSelector:
      matchLabels:
        prometheus: prom-stack  # 이 레이블이 있는 PrometheusRule만 선택

    # 추가 Prometheus 설정 - 기본 ServiceMonitor/PodMonitor로 처리할 수 없는 경우 사용
    additionalScrapeConfigs:
      name: additional-scrape-configs  # 이 이름의 Secret에서 추가 설정 로드
      key: prometheus-additional.yaml  # Secret 내 해당 키의 값을 설정으로 사용

    # 보안 컨텍스트 - 컨테이너 보안 관련 설정
    securityContext:
      fsGroup: 2000       # 파일시스템 그룹 ID
      runAsNonRoot: true  # 루트가 아닌 사용자로 실행 (보안 강화)
      runAsUser: 1000     # 사용자 ID 1000으로 실행
Helm 차트를 업그레이드하여 변경사항을 적용합니다:
helm upgrade prom-stack prometheus-community/kube-prometheus-stack \
  -n monitoring \
  -f prometheus-custom-values.yaml
✅ 추가 스크래핑 설정
일부 타겟은 ServiceMonitor나 PodMonitor로 구성하기 어려울 수 있습니다. 이런 경우 additionalScrapeConfigs를 사용합니다:
# additional-scrape-configs.yaml (Secret으로 저장될 내용)
- job_name: 'external-service'  # 외부 서비스 모니터링을 위한 작업 이름
  scheme: https  # HTTPS 프로토콜 사용 (기본값은 HTTP)
  tls_config:
    insecure_skip_verify: true  # TLS 인증서 검증 건너뛰기 (프로덕션에서는 보안 위험, 테스트용)
  static_configs:  # 정적 타겟 설정 (서비스 디스커버리 없이 직접 지정)
    - targets: ['external-service.example.com:9100']  # 타겟 호스트:포트
      labels:  # 이 타겟에 추가할 레이블
        environment: production
        service: external-service

- job_name: 'blackbox-http'  # Blackbox Exporter를 통한 HTTP 모니터링
  metrics_path: /probe  # Blackbox Exporter의 프로브 엔드포인트
  params:
    module: [http_2xx]  # Blackbox Exporter 모듈 지정 (HTTP 200 응답 확인)
  static_configs:
    - targets:  # 모니터링할 웹사이트/API 목록
      - https://example.com
      - https://api.example.com/health
  relabel_configs:  # 레이블 재작성 설정
    - source_labels: [__address__]  # 원본 주소를 param_target으로 설정
      target_label: __param_target
    - source_labels: [__param_target]  # param_target을 instance 레이블로 설정
      target_label: instance
    - target_label: __address__  # 실제 스크래핑 주소를 Blackbox Exporter로 변경
      replacement: blackbox-exporter:9115  # Blackbox Exporter 서비스 주소
Secret 생성 및 적용:
# 파일에서 Secret 생성
kubectl create secret generic additional-scrape-configs \
  --from-file=prometheus-additional.yaml=additional-scrape-configs.yaml \
  -n monitoring

# 또는 직접 YAML 내용에서 생성
cat <<EOF | kubectl apply -f -
apiVersion: v1
kind: Secret
metadata:
  name: additional-scrape-configs
  namespace: monitoring
type: Opaque
stringData:
  prometheus-additional.yaml: |
    - job_name: 'external-service'
      scheme: https
      tls_config:
        insecure_skip_verify: true
      static_configs:
        - targets: ['external-service.example.com:9100']
          labels:
            environment: production
            service: external-service
EOF
✅ 외부 스토리지 통합
장기 데이터 보존을 위해 외부 스토리지를 구성할 수 있습니다:
# prometheus-remote-storage.yaml
prometheus:
  prometheusSpec:
    # 원격 쓰기 설정 - 수집한 메트릭을 외부 저장소로 전송
    remoteWrite:
      - url: "http://thanos-receive.thanos.svc.cluster.local:19291/api/v1/receive"  # 원격 쓰기 엔드포인트
        # 원격 쓰기 큐 설정 - 대량 데이터 전송 시 성능 튜닝
        remoteTimeout: 30s  # 원격 쓰기 요청 타임아웃
        queueConfig:
          capacity: 10000  # 큐 최대 용량 (샘플 수)
          maxShards: 200  # 최대 병렬 전송 샤드 수 (높을수록 처리량 증가)
          minShards: 1    # 최소 병렬 전송 샤드 수
          maxSamplesPerSend: 2000  # 한 번에 전송할 최대 샘플 수
          batchSendDeadline: 5s    # 배치 전송 최대 대기 시간
          minBackoff: 30ms  # 재시도 최소 대기 시간 (실패 시)
          maxBackoff: 5s    # 재시도 최대 대기 시간 (실패 시)

        # 메트릭 필터링 (선택적) - 특정 메트릭만 원격 저장소로 전송
        writeRelabelConfigs:
          - sourceLabels: [__name__]  # 메트릭 이름 기준 필터링
            regex: 'node_cpu_.*'      # CPU 관련 메트릭만 선택 (정규식 패턴)
            action: keep              # 일치하는 항목만 유지 (불일치는 삭제)

    # 원격 읽기 설정 (선택적) - 외부 저장소에서 메트릭 읽기
    remoteRead:
      - url: "http://thanos-query.thanos.svc.cluster.local:10902/api/v1/read"  # 원격 읽기 엔드포인트
        remoteTimeout: 1m    # 원격 읽기 요청 타임아웃
        readRecent: true     # 최근 데이터도 원격에서 읽을지 여부 (false면 로컬 우선)
▶️ 원격 스토리지 팁: Prometheus의 로컬 스토리지는 15일 정도의 짧은 기간 데이터 저장에 최적화되어 있습니다. 장기 데이터 저장이 필요하다면 Thanos, Cortex, VictoriaMetrics와 같은 솔루션을 원격 스토리지로 구성하는 것이 좋습니다.
📌 Alertmanager 설정 커스터마이징
알림 관리 및 라우팅을 위한 Alertmanager 설정 방법을 알아봅니다.

✅ 기본 알림 설정
Alertmanager CR을 통해 기본 설정을 수정할 수 있습니다:
# alertmanager-custom-values.yaml
alertmanager:
  alertmanagerSpec:
    # 복제본 수 - 고가용성을 위해 3개(홀수) 권장
    replicas: 1

    # 리소스 요구사항 - Alertmanager 컨테이너의 리소스 설정
    resources:
      requests:
        memory: 200Mi  # 최소 200MB 메모리 요청
        cpu: 100m      # 0.1 CPU 코어 요청
      limits:
        memory: 400Mi  # 최대 400MB 메모리 제한
        cpu: 200m      # 최대 0.2 CPU 코어 제한

    # 스토리지 설정 - 알림 상태 및 설정 유지를 위한 영구 저장소
    storage:
      volumeClaimTemplate:
        spec:
          storageClassName: standard  # 사용할 스토리지 클래스
          accessModes: ["ReadWriteOnce"]  # 접근 모드 (단일 노드 읽기/쓰기)
          resources:
            requests:
              storage: 10Gi  # 10GB 스토리지 요청

    # 주요 알림 설정 - alertmanager.yml의 내용
    config:
      # 전역 설정 - 모든 알림에 적용되는 기본값
      global:
        resolve_timeout: 5m  # 해결된 알림 기다리는 시간 (5분 후 resolved 상태로 변경)
        smtp_smarthost: 'smtp.gmail.com:587'  # 이메일 발송을 위한 SMTP 서버
        smtp_from: 'alertmanager@example.com'  # 발신자 이메일 주소
        smtp_auth_username: 'alertmanager@example.com'  # SMTP 인증 사용자명
        smtp_auth_password: 'password'  # SMTP 비밀번호 (시크릿으로 관리 권장)
        smtp_require_tls: true  # TLS 암호화 사용 여부

      # 알림 라우팅 트리 - 알림 대상 결정 및 그룹화 설정
      route:
        # 기본 라우팅 설정
        group_by: ['alertname', 'job', 'severity']  # 알림 그룹화 기준 레이블
        group_wait: 30s  # 첫 알림 후 그룹의 다른 알림을 기다리는 시간
        group_interval: 5m  # 같은 그룹에 대한 알림 재전송 간격
        repeat_interval: 4h  # 해결되지 않은 알림 반복 간격
        receiver: 'email-team'  # 기본 수신자

        # 특정 조건에 대한 하위 라우팅 규칙
        routes:
        # 심각도에 따른 라우팅 - 심각(critical) 수준 알림은 PagerDuty로 전송
        - match:
            severity: critical  # 심각도 레이블이 'critical'인 경우
          receiver: 'pagerduty-critical'  # 대상 수신자
          continue: true  # 일치해도 계속 다음 규칙 평가 (기본값은 false)

        # 특정 팀에 대한 라우팅 - 프론트엔드/API 서비스 알림은 해당 팀 Slack으로 전송
        - match_re:  # 정규식 기반 매칭
            service: ^(frontend|api)$  # 서비스 레이블이 'frontend' 또는 'api'인 경우
          receiver: 'slack-frontend-api'
          continue: true

        # DB 관련 알림 - 데이터베이스 관련 알림은 DB팀 채널로 전송
        - match:
            job: 'db-exporter'  # 작업 레이블이 'db-exporter'인 경우
          receiver: 'slack-db-team'
          group_by: ['alertname', 'db', 'instance']  # DB 알림 전용 그룹화 기준
          group_wait: 1m  # DB 알림은 더 빠르게 그룹화 (1분 대기)

      # 알림 수신자 정의 - 각 수신자 유형별 설정
      receivers:
      # 이메일 수신자 - 기본 팀 이메일로 알림 전송
      - name: 'email-team'
        email_configs:
        - to: 'team@example.com'  # 수신자 이메일
          send_resolved: true  # 해결된 알림도 전송 (기본값은 false)

      # PagerDuty 수신자 - 심각한 알림은 PagerDuty로 전송하여 즉시 대응
      - name: 'pagerduty-critical'
        pagerduty_configs:
        - service_key: ''  # PagerDuty 통합 키
          send_resolved: true  # 해결된 알림도 전송

      # Slack 수신자 (프론트엔드/API팀) - 해당 팀 채널로 알림 전송
      - name: 'slack-frontend-api'
        slack_configs:
        - api_url: 'https://hooks.slack.com/services/T00000000/B00000000/XXXXXXXXXX'  # Slack 웹훅 URL
          channel: '#frontend-api-alerts'  # Slack 채널명
          title: '[{{ .Status | toUpper }}] {{ .CommonLabels.alertname }}'  # 알림 제목 템플릿
          text: "{{ range .Alerts }}*Alert:* {{ .Annotations.summary }}\n*Description:* {{ .Annotations.description }}\n*Severity:* {{ .Labels.severity }}\n*Details:*\n{{ range .Labels.SortedPairs }} • *{{ .Name }}:* {{ .Value }}\n{{ end }}{{ end }}"  # 알림 내용 템플릿
          send_resolved: true  # 해결된 알림도 전송

      # Slack 수신자 (DB팀) - DB 관련 알림은 DB팀 채널로 전송
      - name: 'slack-db-team'
        slack_configs:
        - api_url: 'https://hooks.slack.com/services/T00000000/B00000000/YYYYYYYYYY'  # DB팀 Slack 웹훅
          channel: '#db-alerts'  # DB팀 Slack 채널
          title: '[{{ .Status | toUpper }}] {{ .CommonLabels.alertname }}'  # 알림 제목 템플릿
          text: "{{ range .Alerts }}*Alert:* {{ .Annotations.summary }}\n*Description:* {{ .Annotations.description }}\n*Database:* {{ .Labels.db }}\n*Details:*\n{{ range .Labels.SortedPairs }} • *{{ .Name }}:* {{ .Value }}\n{{ end }}{{ end }}"  # DB 특화 알림 내용
          send_resolved: true  # 해결된 알림도 전송

      # 알림 템플릿 - 커스텀 템플릿 파일 경로
      templates:
      - '/etc/alertmanager/config/*.tmpl'

    # 추가 템플릿 설정 - 알림 형식 커스터마이징
    templateFiles:
      # 이메일 템플릿 - 이메일 알림 형식 정의
      email.tmpl: |
        {{ define "email.subject" }}[{{ .Status | toUpper }}] {{ .CommonLabels.alertname }}{{ end }}
        {{ define "email.text" }}
        Alert: {{ .CommonLabels.alertname }}
        Status: {{ .Status }}
        Severity: {{ .CommonLabels.severity }}

        {{ range .Alerts }}
        Description: {{ .Annotations.description }}
        Details:
        {{ range .Labels.SortedPairs }}
        {{ .Name }}: {{ .Value }}
        {{ end }}
        {{ end }}
        {{ end }}
이 값을 적용하여 Alertmanager를 업데이트합니다:
helm upgrade prom-stack prometheus-community/kube-prometheus-stack \
  -n monitoring \
  -f alertmanager-custom-values.yaml
✅ 알림 템플릿 커스터마이징
알림 템플릿을 사용하면 알림 메시지 형식을 세부적으로 제어할 수 있습니다:
# alertmanager-templates.yaml
alertmanager:
  templateFiles:
    # Slack 알림 템플릿 - Slack 메시지 형식 커스터마이징
    slack.tmpl: |
      {{ define "slack.default.title" }}[{{ .Status | toUpper }}{{ if eq .Status "firing" }}:{{ .Alerts.Firing | len }}{{ end }}] {{ .CommonLabels.alertname }}{{ end }}

      {{ define "slack.default.text" }}
      {{ if gt (len .Alerts.Firing) 0 }}
      *Firing Alerts:*
      {{ range .Alerts.Firing }}
      • *<{{ .GeneratorURL }}|{{ .Labels.instance }} - {{ .Labels.alertname }}>*
        {{ .Annotations.summary }}
        {{ .Annotations.description }}
        *Since:* {{ .StartsAt | since }}
      {{ end }}
      {{ end }}

      {{ if gt (len .Alerts.Resolved) 0 }}
      *Resolved Alerts:*
      {{ range .Alerts.Resolved }}
      • *{{ .Labels.instance }} - {{ .Labels.alertname }}*
        {{ .Annotations.summary }}
        *Resolved:* {{ .EndsAt | since }}
      {{ end }}
      {{ end }}
      {{ end }}

    # 이메일 템플릿 - HTML 형식의 이메일 알림 커스터마이징
    email.tmpl: |
      {{ define "email.default.subject" }}[{{ .Status | toUpper }}] {{ .CommonLabels.alertname }}{{ end }}

      {{ define "email.default.html" }}
      <!DOCTYPE html>
      <html>
      <head>
        <style>
          body { font-family: Arial, sans-serif; }
          .alert { padding: 10px; margin-bottom: 15px; border-radius: 4px; }
          .firing { background-color: #ffebee; border-left: 5px solid #f44336; }
          .resolved { background-color: #e8f5e9; border-left: 5px solid #4caf50; }
          table { border-collapse: collapse; width: 100%; }
          th, td { padding: 8px; text-align: left; border-bottom: 1px solid #ddd; }
          th { background-color: #f2f2f2; }
        </style>
      </head>
      <body>
        <h2>Alert: {{ .CommonLabels.alertname }}</h2>
        <p>Status: <strong>{{ .Status | toUpper }}</strong></p>

        {{ if gt (len .Alerts.Firing) 0 }}
        <h3>Firing Alerts ({{ .Alerts.Firing | len }}):</h3>
        {{ range .Alerts.Firing }}
        <div class="alert firing">
          <h4>{{ .Labels.instance }} - {{ .Labels.alertname }}</h4>
          <p><strong>Summary:</strong> {{ .Annotations.summary }}</p>
          <p><strong>Description:</strong> {{ .Annotations.description }}</p>
          <p><strong>Started:</strong> {{ .StartsAt.Format "2006-01-02 15:04:05" }}</p>

          <table>
            <tr><th>Label</th><th>Value</th></tr>
            {{ range .Labels.SortedPairs }}
            <tr><td>{{ .Name }}</td><td>{{ .Value }}</td></tr>
            {{ end }}
          </table>
        </div>
        {{ end }}
        {{ end }}

        {{ if gt (len .Alerts.Resolved) 0 }}
        <h3>Resolved Alerts ({{ .Alerts.Resolved | len }}):</h3>
        {{ range .Alerts.Resolved }}
        <div class="alert resolved">
          <h4>{{ .Labels.instance }} - {{ .Labels.alertname }}</h4>
          <p><strong>Summary:</strong> {{ .Annotations.summary }}</p>
          <p><strong>Resolved:</strong> {{ .EndsAt.Format "2006-01-02 15:04:05" }}</p>
        </div>
        {{ end }}
        {{ end }}
      </body>
      </html>
      {{ end }}
✅ 알림 연결(Integration) 설정
다양한 서비스와의 통합을 위한 설정을 추가할 수 있습니다:
# alertmanager-integrations.yaml
alertmanager:
  config:
    receivers:
    # Microsoft Teams 연동 - Teams 채널로 알림 전송
    - name: 'msteams'
      webhook_configs:
      - url: 'http://prometheus-msteams:2000/alertmanager'  # MS Teams 프록시 서비스 URL
        send_resolved: true  # 해결된 알림도 전송

    # OpsGenie 연동 - 긴급 알림 및 온콜 관리 서비스
    - name: 'opsgenie'
      opsgenie_configs:
      - api_key: '<opsgenie-api-key>'  # OpsGenie API 키
        message: '{{ .CommonAnnotations.summary }}'  # 알림 메시지 (summary annotation 사용)
        description: '{{ .CommonAnnotations.description }}'  # 알림 상세 설명
        source: 'Prometheus'  # 알림 소스 표시
        responders:  # 알림 대응 담당자/팀 지정
          - name: 'DevOps'  # 담당 팀 이름
            type: 'team'    # 팀 유형 (개인이면 'user')

    # Telegram 연동 - Telegram 봇을 통한 알림
    - name: 'telegram'
      webhook_configs:
      - url: 'http://prometheus-telegram-bot:9087/alert'  # Telegram 봇 서비스 URL
        send_resolved: true  # 해결된 알림도 전송
▶️ 알림 설정 팁: 알림은 "신호 대 잡음 비율"이 중요합니다. 너무 많은 알림은 "알림 피로(Alert Fatigue)"를 유발하고 중요한 알림을 놓치게 만듭니다. 알림 그룹화, 타이밍, 경로 설정을 신중하게 조정하여 정말 중요한 알림만 적절한 사람에게 전달되도록 하세요.
📌 ServiceMonitor 및 PodMonitor 구성
쿠버네티스 환경에서 애플리케이션을 모니터링하기 위한 ServiceMonitor와 PodMonitor 구성 방법을 알아봅니다.
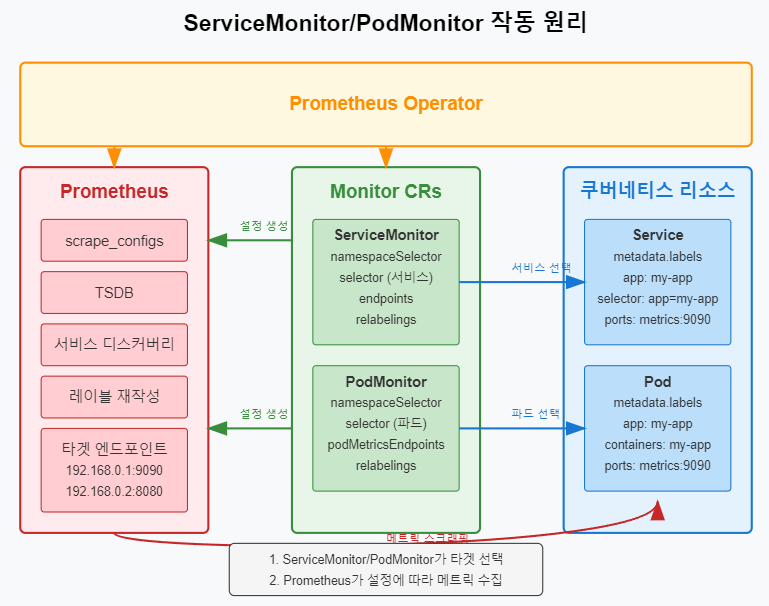
✅ ServiceMonitor 생성 및 설정
서비스를 통해 노출된 메트릭 엔드포인트를 스크래핑하기 위한 ServiceMonitor를 생성합니다:
# custom-service-monitor.yaml
apiVersion: monitoring.coreos.com/v1
kind: ServiceMonitor
metadata:
  name: my-app-monitor  # ServiceMonitor 이름
  namespace: monitoring  # ServiceMonitor가 위치할 네임스페이스
  labels:
    release: prom-stack  # Prometheus에서 이 ServiceMonitor를 선택하기 위한 레이블
spec:
  # 모니터링할 대상 서비스의 네임스페이스 선택
  namespaceSelector:
    matchNames:  # 특정 네임스페이스 지정 (matchLabels 대신 사용)
    - default  # 서비스가 있는 네임스페이스
    - app-namespace  # 여러 네임스페이스 지정 가능

  # 모니터링할 서비스 선택 (레이블 기반)
  selector:
    matchLabels:
      app: my-app  # 이 레이블을 가진 서비스만 선택

  # 엔드포인트 설정 - 메트릭 수집 방법 정의
  endpoints:
  - port: metrics  # 서비스에 정의된 포트 이름 (숫자가 아닌 이름 사용)
    interval: 15s  # 스크래핑 간격 (15초마다 메트릭 수집)
    path: /metrics  # 메트릭 경로 (기본값은 /metrics)

    # mTLS 설정 (선택적) - 보안 연결을 위한 TLS 설정
    scheme: https  # HTTPS 프로토콜 사용
    tlsConfig:
      insecureSkipVerify: false  # 인증서 검증 활성화 (true면 검증 건너뛰기)
      caFile: /etc/prometheus/secrets/my-app-tls/ca.crt  # CA 인증서 경로
      certFile: /etc/prometheus/secrets/my-app-tls/tls.crt  # 클라이언트 인증서
      keyFile: /etc/prometheus/secrets/my-app-tls/tls.key  # 클라이언트 키
      serverName: my-app.example.com  # 서버 이름 (인증서 검증용)

    # 기본 인증 설정 (선택적) - 사용자명/비밀번호 인증
    basicAuth:
      username:  # 사용자명은 Secret에서 참조
        name: my-app-basic-auth  # Secret 이름
        key: username  # Secret 내 키
      password:  # 비밀번호도 Secret에서 참조
        name: my-app-basic-auth  # Secret 이름
        key: password  # Secret 내 키

    # 스크래핑 전 레이블 재작성 (메타데이터 조작) - 수집 전 레이블 처리
    relabelings:
    # 파드 이름을 instance 레이블로 설정
    - sourceLabels: [__meta_kubernetes_pod_name]  # 소스 레이블(쿠버네티스 메타데이터)
      targetLabel: instance  # 대상 레이블 이름

    # 네임스페이스 정보 추가
    - sourceLabels: [__meta_kubernetes_namespace]  # 네임스페이스 메타데이터
      targetLabel: namespace  # namespace 레이블로 저장

    # 서비스 이름 추가
    - sourceLabels: [__meta_kubernetes_service_name]  # 서비스 이름 메타데이터
      targetLabel: service  # service 레이블로 저장

    # 애플리케이션 버전 정보 추가 (파드 레이블에서)
    - sourceLabels: [__meta_kubernetes_pod_label_version]  # 파드의 version 레이블
      targetLabel: version  # version 레이블로 저장

    # 메트릭 수집 후 레이블 조작 - 수집된 메트릭의 레이블 처리
    metricRelabelings:
    # 특정 메트릭 필터링 (go_* 메트릭 제외)
    - sourceLabels: [__name__]  # 메트릭 이름 레이블
      regex: go_.*  # 'go_'로 시작하는 모든 메트릭
      action: drop  # 일치하는 메트릭 제외

    # 높은 카디널리티 레이블 제거 - 스토리지 부담 감소
    - regex: 'id|uuid|session_id|request_id'  # 높은 카디널리티 레이블 패턴
      action: labeldrop  # 해당 레이블 삭제
ServiceMonitor를 적용합니다:
kubectl apply -f custom-service-monitor.yaml
✅ PodMonitor 생성 및 설정
서비스 없이 직접 파드의 메트릭 엔드포인트를 스크래핑하기 위한 PodMonitor를 생성합니다:
# custom-pod-monitor.yaml
apiVersion: monitoring.coreos.com/v1
kind: PodMonitor
metadata:
  name: batch-job-monitor  # PodMonitor 이름
  namespace: monitoring  # PodMonitor가 위치할 네임스페이스
  labels:
    release: prom-stack  # Prometheus에서 이 PodMonitor를 선택하기 위한 레이블
spec:
  # 모니터링할 대상 파드의 네임스페이스 선택
  namespaceSelector:
    matchNames:
    - batch-jobs  # 파드가 있는 네임스페이스 (여러 개 지정 가능)

  # 모니터링할 파드 선택 (레이블 기반)
  selector:
    matchLabels:
      app: batch-processor  # 이 레이블을 가진 파드만 선택

  # 파드 메트릭 엔드포인트 설정 - 메트릭 수집 방법 정의
  podMetricsEndpoints:
  - port: metrics  # 컨테이너 포트 이름 (containerPort의 name 값)
    interval: 30s  # 스크래핑 간격 (30초마다 메트릭 수집)
    path: /metrics  # 메트릭 경로

    # 특정 컨테이너 타겟팅 (선택적)
    targetPort: 9090  # 실제 컨테이너 포트 번호 (포트 이름 대신 사용 가능)

    # 레이블 재작성 - 메타데이터 및 컨텍스트 추가
    relabelings:
    # 잡 이름을 작업 레이블로 설정
    - sourceLabels: [__meta_kubernetes_pod_label_job_name]  # 파드의 job_name 레이블
      targetLabel: job  # job 레이블로 저장

    # 처리 작업 타입 추가 (어노테이션에서 정보 추출)
    - sourceLabels: [__meta_kubernetes_pod_annotation_processor_type]  # 파드 어노테이션
      targetLabel: processor_type  # processor_type 레이블로 저장
PodMonitor를 적용합니다:
kubectl apply -f custom-pod-monitor.yaml
✅ 애플리케이션 준비
애플리케이션이 Prometheus 메트릭을 제공하도록 준비해야 합니다:
- 서비스 정의 예시:
# app-service.yaml
apiVersion: v1
kind: Service
metadata:
  name: my-app  # 서비스 이름
  namespace: default  # 서비스가 위치할 네임스페이스
  labels:
    app: my-app  # ServiceMonitor의 selector와 일치해야 함
spec:
  selector:
    app: my-app  # 이 레이블을 가진 파드를 대상으로 함
  ports:
  - name: web  # 애플리케이션 웹 포트 (일반 트래픽용)
    port: 80  # 서비스 포트
    targetPort: 8080  # 컨테이너 포트
  - name: metrics  # 메트릭 포트 (ServiceMonitor의 endpoint port와 일치해야 함)
    port: 9090  # 서비스 포트
    targetPort: 9090  # 컨테이너 내 메트릭 포트
- 매트릭 익스포트 설정:
팀에게 다음과 같은 가이드를 제공하여 애플리케이션이 Prometheus 형식의 메트릭을 노출하도록 할 수 있습니다:
# Python 예시 (Flask + Prometheus 클라이언트)
from flask import Flask
from prometheus_client import Counter, Histogram, start_http_server
import time

app = Flask(__name__)

# 메트릭 정의 - Prometheus 메트릭 객체 생성
REQUEST_COUNT = Counter(
    'app_request_count',  # 메트릭 이름 (app_ 접두사로 구분)
    'Total request count',  # 메트릭 설명
    ['method', 'endpoint']  # 메트릭 차원(레이블)
)
REQUEST_LATENCY = Histogram(
    'app_request_latency_seconds',  # 메트릭 이름 (단위를 접미사로 표시)
    'Request latency in seconds',  # 메트릭 설명
    ['method', 'endpoint']  # 메트릭 차원(레이블)
)

# 메트릭 서버 시작 (애플리케이션 포트와 별도) - 9090 포트에서 메트릭 제공
start_http_server(9090)  # 메트릭용 포트 (ServiceMonitor와 일치해야 함)

@app.route('/')
def hello():
    # 시작 시간 기록 - 지연 시간 측정용
    start_time = time.time()

    # 비즈니스 로직
    # ...

    # 메트릭 업데이트 - 요청 카운터 증가 및 응답 시간 기록
    REQUEST_COUNT.labels(method='GET', endpoint='/').inc()  # 카운터 증가
    REQUEST_LATENCY.labels(method='GET', endpoint='/').observe(
        time.time() - start_time  # 응답 시간 측정 및 기록
    )

    return "Hello World!"

if __name__ == '__main__':
    app.run(host='0.0.0.0', port=8080)  # 8080 포트에서 웹 서버 실행
// Java 예시 (Spring Boot + Micrometer)
import io.micrometer.core.instrument.Counter;
import io.micrometer.core.instrument.MeterRegistry;
import io.micrometer.core.instrument.Timer;
import org.springframework.web.bind.annotation.GetMapping;
import org.springframework.web.bind.annotation.RestController;

@RestController
public class HelloController {

    private final Counter requestCounter;  // 요청 수 측정용 카운터
    private final Timer requestTimer;  // 응답 시간 측정용 타이머

    public HelloController(MeterRegistry registry) {
        // 메트릭 정의 - Spring Boot는 자동으로 Prometheus 형식으로 변환
        this.requestCounter = Counter.builder("app_request_count")  // 메트릭 이름
                                    .description("Total request count")  // 설명
                                    .tag("endpoint", "/hello")  // 레이블
                                    .register(registry);  // 레지스트리에 등록

        this.requestTimer = Timer.builder("app_request_latency_seconds")  // 메트릭 이름
                                .description("Request latency in seconds")  // 설명
                                .tag("endpoint", "/hello")  // 레이블
                                .register(registry);  // 레지스트리에 등록
    }

    @GetMapping("/hello")
    public String hello() {
        // 메트릭 기록 - 카운터 증가
        requestCounter.increment();

        // 타이머로 응답 시간 측정 및 기록
        return requestTimer.record(() -> {
            // 비즈니스 로직
            return "Hello World!";
        });
    }
}
▶️ 모니터링 통합 팁: 애플리케이션 개발자들에게 표준화된 메트릭 가이드를 제공하세요. 메트릭 이름, 라벨링 규칙, 측정해야 할 주요 지표 등을 포함한 문서를 만들면 일관된 모니터링이 가능합니다.
📌 PrometheusRule을 통한 알림 및 기록 규칙 설정
알림 규칙과 기록 규칙을 관리하기 위한 PrometheusRule 리소스 구성 방법을 알아봅니다.
✅ 알림 규칙 생성
# custom-alert-rules.yaml
apiVersion: monitoring.coreos.com/v1
kind: PrometheusRule
metadata:
  name: custom-application-rules  # 규칙 이름
  namespace: monitoring  # 규칙이 위치할 네임스페이스
  labels:
    release: prom-stack  # Prometheus에서 이 규칙을 선택하기 위한 레이블
spec:
  groups:
  # 애플리케이션 알림 그룹 - 관련 규칙 그룹화
  - name: application-alerts  # 그룹 이름 (Prometheus UI에 표시됨)
    rules:
    # 높은 에러율 알림 - API 오류율이 임계값을 초과할 때
    - alert: HighErrorRate  # 알림 이름 (Alertmanager에 표시됨)
      expr: sum(rate(app_request_count{status=~"5.."}[5m])) / sum(rate(app_request_count[5m])) > 0.05  # PromQL 표현식
      for: 5m  # 5분 동안 조건이 지속되면 알림 (일시적 스파이크 무시)
      labels:
        severity: critical  # 알림 심각도 (Alertmanager 라우팅에 사용)
        team: backend  # 담당 팀 (Alertmanager 라우팅에 사용)
      annotations:
        summary: "High error rate detected"  # 알림 요약 (짧은 제목)
        description: "Error rate is above 5% for 5 minutes (current value: {{ $value | humanizePercentage }})"  # 알림 상세 설명 (값 포함)
        runbook_url: "https://wiki.example.com/runbooks/high-error-rate"  # 문제 해결 가이드 링크

    # 응답 시간 지연 알림 - 서비스 응답이 느릴 때
    - alert: SlowResponseTime  # 알림 이름
      expr: histogram_quantile(0.95, sum(rate(app_request_latency_seconds_bucket[5m])) by (le, service)) > 1  # 95 백분위수 응답 시간
      for: 10m  # 10분 동안 조건이 지속되면 알림
      labels:
        severity: warning  # 경고 수준 (critical보다 낮음)
        team: backend  # 담당 팀
      annotations:
        summary: "Slow response time detected"  # 알림 요약
        description: "95th percentile response time is above 1 second for service {{ $labels.service }} (current value: {{ $value }}s)"  # 서비스별 설명
        dashboard_url: "https://grafana.example.com/d/abc123/app-dashboard?var-service={{ $labels.service }}"  # 대시보드 링크

    # 높은 리소스 사용률 알림 - CPU 사용량이 한계에 가까울 때
    - alert: HighCPUUsage  # 알림 이름
      expr: sum(rate(container_cpu_usage_seconds_total{container!="POD", pod=~"app-.*"}[5m])) by (pod) / sum(container_spec_cpu_quota{container!="POD", pod=~"app-.*"} / container_spec_cpu_period{container!="POD", pod=~"app-.*"}) by (pod) > 0.8  # CPU 사용률 80% 초과
      for: 15m  # 15분 동안 조건이 지속되면 알림
      labels:
        severity: warning  # 경고 수준
        team: platform  # 플랫폼팀 담당
      annotations:
        summary: "High CPU usage detected"  # 알림 요약
        description: "Pod {{ $labels.pod }} is using more than 80% of its CPU limit for 15 minutes (current value: {{ $value | humanizePercentage }})"  # 파드별 상세 설명

  # 데이터베이스 알림 그룹 - DB 관련 알림 모음
  - name: database-alerts  # 그룹 이름
    rules:
    # 연결 풀 포화 알림 - DB 연결이 한계에 가까울 때
    - alert: DatabaseConnectionPoolSaturation  # 알림 이름
      expr: sum(db_connections_active) / sum(db_connections_max) > 0.8  # 연결 풀 사용률 80% 초과
      for: 5m  # 5분 동안 조건이 지속되면 알림
      labels:
        severity: warning  # 경고 수준
        team: dba  # DB 관리팀 담당
      annotations:
        summary: "Database connection pool near saturation"  # 알림 요약
        description: "Connection pool is above 80% capacity for 5 minutes (current value: {{ $value | humanizePercentage }})"  # 상세 설명

    # 높은 데이터베이스 부하 - DB 쿼리 수가 많을 때
    - alert: HighDatabaseLoad  # 알림 이름
      expr: rate(mysql_global_status_questions[5m]) > 1000  # 초당 1000 쿼리 이상
      for: 10m  # 10분 동안 조건이 지속되면 알림
      labels:
        severity: warning  # 경고 수준
        team: dba  # DB 관리팀 담당
      annotations:
        summary: "High database load detected"  # 알림 요약
        description: "Database is processing more than 1000 queries per second for 10 minutes (current value: {{ $value }} qps)"  # 초당 쿼리 수 표시
✅ 기록 규칙 생성
기록 규칙(Recording Rules)을 사용하면 자주 사용하는 복잡한 쿼리를 미리 계산하여 성능을 향상시킬 수 있습니다:
# custom-recording-rules.yaml
apiVersion: monitoring.coreos.com/v1
kind: PrometheusRule
metadata:
  name: custom-recording-rules  # 규칙 이름
  namespace: monitoring  # 네임스페이스
  labels:
    release: prom-stack  # Prometheus에서 이 규칙을 선택하기 위한 레이블
spec:
  groups:
  # API 서비스 기록 규칙 - API 성능 관련 미리 계산된 지표
  - name: api-service-metrics  # 규칙 그룹 이름
    interval: 1m  # 계산 주기 (1분마다 실행)
    rules:
    # 서비스별 요청 비율 - 서비스당 초당 요청 수
    - record: service:request_rate:5m  # 새 메트릭 이름 (namespace:name:window 형식)
      expr: sum(rate(app_request_count[5m])) by (service)  # PromQL 표현식

    # 엔드포인트별 에러율 - 서비스와 엔드포인트별 오류 비율
    - record: endpoint:error_rate:5m  # 새 메트릭 이름
      expr: sum(rate(app_request_count{status=~"5.."}[5m])) by (service, endpoint) / sum(rate(app_request_count[5m])) by (service, endpoint)  # 5xx 상태 코드 비율

    # 서비스별 응답 시간 분포 - 95 백분위수 응답 시간
    - record: service:response_time_quantile:5m  # 새 메트릭 이름
      expr: histogram_quantile(0.95, sum(rate(app_request_latency_seconds_bucket[5m])) by (le, service))  # 서비스별 95 백분위수

  # 노드 기록 규칙 - 노드 성능 관련 미리 계산된 지표
  - name: node-metrics  # 규칙 그룹 이름
    interval: 1m  # 계산 주기 (1분마다 실행)
    rules:
    # 노드별 CPU 사용률 - idle 모드를 제외한 CPU 사용 비율
    - record: node:cpu_utilization:avg5m  # 새 메트릭 이름
      expr: 100 - (avg by (instance) (rate(node_cpu_seconds_total{mode="idle"}[5m])) * 100)  # CPU 사용률 (100% - idle%)

    # 노드별 메모리 사용률 - 전체 메모리 대비 사용 중인 메모리 비율
    - record: node:memory_utilization:avg5m  # 새 메트릭 이름
      expr: 100 * (1 - (node_memory_MemAvailable_bytes / node_memory_MemTotal_bytes))  # 메모리 사용률 계산

    # 노드별 디스크 사용률 - 루트 파티션 기준 디스크 사용 비율
    - record: node:disk_utilization:avg5m  # 새 메트릭 이름
      expr: 100 * (1 - node_filesystem_avail_bytes{mountpoint="/"} / node_filesystem_size_bytes{mountpoint="/"})  # 디스크 사용률
규칙을 적용합니다:
kubectl apply -f custom-alert-rules.yaml
kubectl apply -f custom-recording-rules.yaml
✅ 알림 규칙 테스트
알림 규칙을 테스트하여 예상대로 작동하는지 확인할 수 있습니다:
# Prometheus UI에서 직접 표현식 테스트
# 또는 명령줄에서:
curl -s "http://localhost:9090/api/v1/query?query=sum(rate(app_request_count{status=~%225..%22}[5m]))+/+sum(rate(app_request_count[5m]))+>+0.05"
▶️ 알림 규칙 팁: 각 알림 규칙에는 명확한 '해결 지침(runbook)' 링크를 포함하여 팀이 알림 발생 시 무엇을 해야 할지 바로 알 수 있도록 하세요. 또한 알림은 실제 문제가 있을 때만 발생하도록 신중하게 조정해야 합니다.
📌 Grafana 설정 커스터마이징
Grafana의 설정을 사용자 정의하여 시각화 및 대시보드 경험을 개선하는 방법을 알아봅니다.

✅ 기본 설정 커스터마이징
# grafana-custom-values.yaml
grafana:
  # 관리자 계정 설정
  adminUser: admin  # Grafana의 초기 관리자 사용자 이름 설정
  adminPassword: admin  # 관리자 비밀번호 (실제 환경에서는 보안 시크릿으로 대체 권장)

  # 서비스 설정 - Grafana에 접근하기 위한 쿠버네티스 서비스 유형
  service:
    type: ClusterIP  # 서비스 유형 (ClusterIP, NodePort, LoadBalancer 중 선택)

  # 리소스 설정 - Grafana 파드의 컴퓨팅 리소스 제한
  resources:
    limits:
      cpu: 200m  # 최대 0.2 CPU 코어까지 사용 가능
      memory: 256Mi  # 최대 256MB 메모리까지 사용 가능
    requests:
      cpu: 100m  # 최소 0.1 CPU 코어 요청
      memory: 128Mi  # 최소 128MB 메모리 요청

  # 영구 스토리지 설정 - 대시보드 및 설정 유지
  persistence:
    enabled: true  # 영구 스토리지 사용 활성화
    size: 10Gi  # 10GB 스토리지 요청
    storageClassName: standard  # 사용할 스토리지 클래스

  # 메인 Grafana 설정 (grafana.ini)
  grafana.ini:
    # 서버 설정 - Grafana 서버의 기본 주소와 접근 설정
    server:
      domain: grafana.example.com  # Grafana가 사용할 도메인 이름
      root_url: https://grafana.example.com  # 완전한 URL 경로 (프록시 뒤에 있을 경우 중요)

    # 보안 설정 - 인증 및 접근 제어 관련 설정
    security:
      admin_user: admin  # 관리자 사용자 이름 (adminUser와 동일하게)
      admin_password: admin  # 관리자 비밀번호 (시크릿으로 관리 권장)
      secret_key: ${GRAFANA_SECRET_KEY}  # 세션 암호화 키 (환경 변수에서 가져옴)
      disable_initial_admin_creation: false  # 초기 관리자 계정 생성 여부
      allow_embedding: true  # iframe 임베딩 허용 (대시보드 공유 시)

    # 인증 설정 - 사용자 로그인 관련 설정
    auth:
      disable_login_form: false  # 로그인 폼 사용 여부 (OAuth 전용 시 비활성화)

    # LDAP 인증 (선택적) - 기업 디렉토리 서비스 연동
    auth.ldap:
      enabled: false  # LDAP 인증 활성화 여부
      config_file: /etc/grafana/ldap.toml  # LDAP 설정 파일 경로

    # OAuth 인증 (선택적) - 외부 ID 제공자 연동 (Google 예시)
    auth.google:
      enabled: false  # Google OAuth 활성화 여부
      client_id: ${GOOGLE_CLIENT_ID}  # Google OAuth 클라이언트 ID (환경 변수)
      client_secret: ${GOOGLE_CLIENT_SECRET}  # Google OAuth 클라이언트 시크릿
      scopes: https://www.googleapis.com/auth/userinfo.profile https://www.googleapis.com/auth/userinfo.email  # 요청 권한
      auth_url: https://accounts.google.com/o/oauth2/auth  # 인증 URL
      token_url: https://accounts.google.com/o/oauth2/token  # 토큰 URL
      allowed_domains: example.com  # 허용할 이메일 도메인 (회사 도메인)
      allow_sign_up: true  # 자동 사용자 생성 허용

    # 사용자 설정 - 사용자 관리 관련 설정
    users:
      allow_sign_up: false  # 일반 사용자 등록 허용 여부
      auto_assign_org: true  # 자동 조직 할당
      auto_assign_org_role: Viewer  # 기본 할당 역할 (Viewer, Editor, Admin)

    # 메트릭 설정 - Grafana 자체 메트릭 수집 설정
    metrics:
      enabled: true  # Grafana 내부 메트릭 활성화
      basic_auth_username: metrics  # 메트릭 접근 사용자 (선택적)
      basic_auth_password: metrics  # 메트릭 접근 비밀번호 (선택적)

    # 로그 설정 - Grafana 로깅 설정
    log:
      mode: console  # 로그 출력 모드 (console, file, syslog)
      level: info  # 로그 수준 (debug, info, warn, error, critical)

  # SMTP 설정 - 이메일 알림을 위한 설정
  smtp:
    enabled: true  # SMTP 활성화 여부
    host: smtp.example.com:587  # SMTP 서버 주소:포트
    user: grafana@example.com  # SMTP 사용자
    password: password  # SMTP 비밀번호 (시크릿으로 관리 권장)
    from_address: grafana@example.com  # 발신자 이메일
    from_name: Grafana Alert  # 발신자 이름
    # TLS/STARTTLS 설정 (필요한 경우)
    startTLS_policy: OpportunisticStartTLS  # STARTTLS 정책

  # 플러그인 설정 - 추가 플러그인 설치
  plugins:
    - grafana-piechart-panel  # 파이 차트 패널 플러그인
    - grafana-worldmap-panel  # 세계 지도 패널 플러그인
    - grafana-clock-panel  # 시계 패널 플러그인
    - vonage-status-panel  # 상태 패널 플러그인

  # 대시보드 프로비저닝 - 자동으로 대시보드 로드
  dashboardProviders:
    dashboardproviders.yaml:
      apiVersion: 1
      providers:
      - name: 'default'  # 프로바이더 이름
        orgId: 1  # Grafana 조직 ID
        folder: ''  # 대시보드를 저장할 폴더
        type: file  # 프로바이더 타입 (file 기반)
        disableDeletion: false  # UI에서 삭제 방지
        editable: true  # UI에서 편집 가능
        options:
          path: /var/lib/grafana/dashboards/default  # 대시보드 파일 경로

  # 대시보드 정의 - 사용자 정의 대시보드 추가
  dashboards:
    default:
      # 노드 대시보드 예시
      node-exporter:
        gnetId: 1860  # Grafana.com 대시보드 ID
        revision: 22  # 대시보드 리비전 (버전)
        datasource:  # 데이터 소스 매핑
          - name: DS_PROMETHEUS  # 대시보드의 데이터 소스 이름
            value: Prometheus  # 실제 데이터 소스 이름

  # 데이터 소스 설정 - 기본 데이터 소스 구성
  datasources:
    datasources.yaml:
      apiVersion: 1
      datasources:
      - name: Prometheus  # 데이터 소스 이름
        type: prometheus  # 데이터 소스 타입
        url: http://prom-stack-kube-prometheus-prometheus:9090  # Prometheus 서비스 URL
        access: proxy  # 접근 모드 (proxy 또는 direct)
        isDefault: true  # 기본 데이터 소스로 설정
        # jsonData 필드로 추가 옵션 설정
        jsonData:
          timeInterval: "15s"  # 스크래핑 간격 힌트
          httpMethod: "GET"  # HTTP 메서드
          exemplarTraceIdDestinations:  # 예시 트레이스 설정 (Tempo 연동)
            - name: "traceID"
              datasourceUid: "tempo"
✅ 커스텀 대시보드 추가
사전 정의된 대시보드를 제공하여 사용자가 즉시 사용할 수 있도록 할 수 있습니다:
# custom-dashboards.yaml
grafana:
  dashboards:
    default:
      # 애플리케이션 대시보드 - API 서비스 모니터링용
      api-dashboard:
        json: |
          {
            "annotations": {
              "list": [
                {
                  "builtIn": 1,
                  "datasource": "-- Grafana --",
                  "enable": true,
                  "hide": true,
                  "iconColor": "rgba(0, 211, 255, 1)",
                  "name": "Annotations & Alerts",
                  "type": "dashboard"
                }
              ]
            },
            "editable": true,
            "gnetId": null,
            "graphTooltip": 0,
            "id": null,
            "links": [],
            "panels": [
              {
                "aliasColors": {},
                "bars": false,
                "dashLength": 10,
                "dashes": false,
                "datasource": "Prometheus",
                "fieldConfig": {
                  "defaults": {
                    "links": []
                  },
                  "overrides": []
                },
                "fill": 1,
                "fillGradient": 0,
                "gridPos": {
                  "h": 8,
                  "w": 12,
                  "x": 0,
                  "y": 0
                },
                "hiddenSeries": false,
                "id": 1,
                "legend": {
                  "avg": false,
                  "current": false,
                  "max": false,
                  "min": false,
                  "show": true,
                  "total": false,
                  "values": false
                },
                "lines": true,
                "linewidth": 1,
                "nullPointMode": "null",
                "options": {
                  "alertThreshold": true
                },
                "percentage": false,
                "pluginVersion": "7.5.5",
                "pointradius": 2,
                "points": false,
                "renderer": "flot",
                "seriesOverrides": [],
                "spaceLength": 10,
                "stack": false,
                "steppedLine": false,
                "targets": [
                  {
                    "expr": "sum(rate(app_request_count[5m])) by (service)",
                    "interval": "",
                    "legendFormat": "{{service}}",
                    "refId": "A"
                  }
                ],
                "thresholds": [],
                "timeFrom": null,
                "timeRegions": [],
                "timeShift": null,
                "title": "Request Rate by Service",
                "tooltip": {
                  "shared": true,
                  "sort": 0,
                  "value_type": "individual"
                },
                "type": "graph",
                "xaxis": {
                  "buckets": null,
                  "mode": "time",
                  "name": null,
                  "show": true,
                  "values": []
                },
                "yaxes": [
                  {
                    "format": "short",
                    "label": "Requests/s",
                    "logBase": 1,
                    "max": null,
                    "min": "0",
                    "show": true
                  },
                  {
                    "format": "short",
                    "label": null,
                    "logBase": 1,
                    "max": null,
                    "min": null,
                    "show": true
                  }
                ],
                "yaxis": {
                  "align": false,
                  "alignLevel": null
                }
              },
              {
                "aliasColors": {
                  "4xx": "yellow",
                  "5xx": "red"
                },
                "bars": false,
                "dashLength": 10,
                "dashes": false,
                "datasource": "Prometheus",
                "fieldConfig": {
                  "defaults": {
                    "links": []
                  },
                  "overrides": []
                },
                "fill": 1,
                "fillGradient": 0,
                "gridPos": {
                  "h": 8,
                  "w": 12,
                  "x": 12,
                  "y": 0
                },
                "hiddenSeries": false,
                "id": 2,
                "legend": {
                  "avg": false,
                  "current": false,
                  "max": false,
                  "min": false,
                  "show": true,
                  "total": false,
                  "values": false
                },
                "lines": true,
                "linewidth": 1,
                "nullPointMode": "null",
                "options": {
                  "alertThreshold": true
                },
                "percentage": false,
                "pluginVersion": "7.5.5",
                "pointradius": 2,
                "points": false,
                "renderer": "flot",
                "seriesOverrides": [],
                "spaceLength": 10,
                "stack": false,
                "steppedLine": false,
                "targets": [
                  {
                    "expr": "sum(rate(app_request_count{status=~\"4..\"}[5m]))",
                    "interval": "",
                    "legendFormat": "4xx",
                    "refId": "A"
                  },
                  {
                    "expr": "sum(rate(app_request_count{status=~\"5..\"}[5m]))",
                    "interval": "",
                    "legendFormat": "5xx",
                    "refId": "B"
                  }
                ],
                "thresholds": [],
                "timeFrom": null,
                "timeRegions": [],
                "timeShift": null,
                "title": "Error Rates",
                "tooltip": {
                  "shared": true,
                  "sort": 0,
                  "value_type": "individual"
                },
                "type": "graph",
                "xaxis": {
                  "buckets": null,
                  "mode": "time",
                  "name": null,
                  "show": true,
                  "values": []
                },
                "yaxes": [
                  {
                    "format": "short",
                    "label": "Errors/s",
                    "logBase": 1,
                    "max": null,
                    "min": "0",
                    "show": true
                  },
                  {
                    "format": "short",
                    "label": null,
                    "logBase": 1,
                    "max": null,
                    "min": null,
                    "show": true
                  }
                ],
                "yaxis": {
                  "align": false,
                  "alignLevel": null
                }
              }
            ],
            "refresh": "10s",
            "schemaVersion": 27,
            "style": "dark",
            "tags": ["api", "application"],
            "templating": {
              "list": [
                {
                  "allValue": null,
                  "current": {
                    "selected": false,
                    "text": "All",
                    "value": "$__all"
                  },
                  "datasource": "Prometheus",
                  "definition": "label_values(app_request_count, service)",
                  "description": null,
                  "error": null,
                  "hide": 0,
                  "includeAll": true,
                  "label": "Service",
                  "multi": false,
                  "name": "service",
                  "options": [],
                  "query": {
                    "query": "label_values(app_request_count, service)",
                    "refId": "StandardVariableQuery"
                  },
                  "refresh": 1,
                  "regex": "",
                  "skipUrlSync": false,
                  "sort": 1,
                  "tagValuesQuery": "",
                  "tags": [],
                  "tagsQuery": "",
                  "type": "query",
                  "useTags": false
                }
              ]
            },
            "time": {
              "from": "now-6h",
              "to": "now"
            },
            "timepicker": {},
            "timezone": "",
            "title": "API Services Dashboard",
            "uid": "api-services",
            "version": 1
          }
✅ 추가 데이터 소스 설정
추가 데이터 소스를 구성하여 더 다양한 시스템을 모니터링할 수 있습니다:
# additional-datasources.yaml
grafana:
  additionalDataSources:
  # Loki 데이터 소스 - 로그 쿼리 및 시각화용
  - name: Loki  # 데이터 소스 이름
    type: loki  # 데이터 소스 유형 (로그 시스템)
    url: http://loki.logging.svc.cluster.local:3100  # Loki 서비스 URL
    access: proxy  # 접근 모드 (proxy는 Grafana를 통해 접근)
    isDefault: false  # 기본 데이터 소스가 아님
    jsonData:
      maxLines: 1000  # 최대 로그 라인 수

  # InfluxDB 데이터 소스 - 시계열 데이터 쿼리용
  - name: InfluxDB  # 데이터 소스 이름
    type: influxdb  # 데이터 소스 유형 (시계열 DB)
    url: http://influxdb.monitoring.svc.cluster.local:8086  # InfluxDB 서비스 URL
    access: proxy  # 접근 모드
    database: metrics  # 사용할 데이터베이스 이름
    user: grafana  # 접근 사용자
    secureJsonData:
      password: password  # 비밀번호 (시크릿 필드)
    jsonData:
      httpMode: GET  # HTTP 요청 모드
      defaultBucket: metrics  # InfluxDB 2.x 버킷

  # Tempo 데이터 소스 - 분산 트레이싱 시스템 연동
  - name: Tempo  # 데이터 소스 이름
    type: tempo  # 데이터 소스 유형 (트레이싱)
    uid: tempo  # 고유 식별자 (Prometheus 연동에 사용)
    url: http://tempo.tracing.svc.cluster.local:3100  # Tempo 서비스 URL
    access: proxy  # 접근 모드
    jsonData:
      httpMethod: GET  # HTTP 요청 모드
      tracesToLogs:  # 트레이스를 로그와 연결하는 설정
        datasourceUid: 'loki'  # Loki 데이터 소스 ID
        tags: ['service', 'pod']  # 태그 매핑
        mappedTags: [{ key: 'service.name', value: 'service' }]  # 태그 변환 매핑
        mapTagNamesEnabled: false  # 태그 이름 매핑 활성화 여부
        spanStartTimeShift: '1h'  # 시간 범위 시작 시프트
        spanEndTimeShift: '1h'  # 시간 범위 종료 시프트
        filterByTraceID: false  # 트레이스 ID로 필터링
✅ 사용자 인증 및 권한 설정
외부 인증 시스템을 통합하고 세부적인 권한 관리를 구성할 수 있습니다:
# auth-config.yaml
grafana:
  # LDAP 설정
  ldap:
    enabled: true  # LDAP 인증 활성화
    config: |  # LDAP 설정 내용
      verbose_logging = true

      [[servers]]
      host = "ldap.example.com"
      port = 389
      use_ssl = false
      start_tls = true
      bind_dn = "cn=grafana,dc=example,dc=com"
      bind_password = "grafana_password"
      search_filter = "(sAMAccountName=%s)"
      search_base_dns = ["dc=example,dc=com"]

      [servers.attributes]
      name = "givenName"
      surname = "sn"
      username = "sAMAccountName"
      member_of = "memberOf"
      email = "mail"

      [[servers.group_mappings]]
      group_dn = "cn=admins,dc=example,dc=com"
      org_role = "Admin"
      grafana_admin = true

      [[servers.group_mappings]]
      group_dn = "cn=editors,dc=example,dc=com"
      org_role = "Editor"

      [[servers.group_mappings]]
      group_dn = "*"
      org_role = "Viewer"
▶️ Grafana 설정 팁: 대규모 조직에서는 권한 관리가 중요합니다. Grafana의 폴더 기반 권한 시스템을 활용하여 팀별로 대시보드를 관리하고, LDAP 그룹 매핑을 통해 적절한 접근 권한을 부여하세요.
📌 보안 강화 설정
운영 환경에서 모니터링 스택의 보안을 강화하기 위한 설정 방법을 알아봅니다.
✅ 네트워크 정책 설정
모니터링 컴포넌트 간 통신을 제한하는 네트워크 정책을 설정할 수 있습니다:
# monitoring-network-policy.yaml
apiVersion: networking.k8s.io/v1
kind: NetworkPolicy
metadata:
  name: prometheus-server  # 네트워크 정책 이름
  namespace: monitoring  # 적용할 네임스페이스
spec:
  podSelector:  # 정책이 적용될 파드 선택
    matchLabels:
      app: prometheus  # Prometheus 서버 파드 선택
  policyTypes:
  - Ingress  # 수신 트래픽 제어
  - Egress   # 송신 트래픽 제어

  ingress:  # 수신 규칙
  # Grafana에서의 접근 허용
  - from:
    - podSelector:
        matchLabels:
          app: grafana  # Grafana 파드로부터의 트래픽 허용
    ports:
    - protocol: TCP
      port: 9090  # Prometheus API 포트

  # Alertmanager에서의 접근 허용
  - from:
    - podSelector:
        matchLabels:
          app: alertmanager  # Alertmanager 파드로부터의 트래픽 허용
    ports:
    - protocol: TCP
      port: 9090  # Prometheus API 포트

  # kube-prometheus-operator에서의 접근 허용
  - from:
    - podSelector:
        matchLabels:
          app: kube-prometheus-stack-operator  # Operator 파드로부터의 트래픽 허용
    ports:
    - protocol: TCP
      port: 9090  # Prometheus API 포트

  egress:  # 송신 규칙
  # 대상 스크래핑을 위한 송신 허용
  - to:
    - namespaceSelector: {}  # 모든 네임스페이스
    ports:
    - protocol: TCP
      port: 9100  # Node Exporter 포트
    - protocol: TCP
      port: 10250  # Kubelet 메트릭 포트
    - protocol: TCP
      port: 9090  # Prometheus 포트
    - protocol: TCP
      port: 8080  # 일반적인 메트릭 포트
✅ TLS 설정
통신 암호화를 위해 TLS를 구성할 수 있습니다:
# prometheus-tls.yaml
prometheus:
  prometheusSpec:
    # TLS 설정
    web:
      tlsConfig:
        cert:
          secret:
            name: prometheus-server-tls  # 인증서 시크릿 이름
            key: tls.crt  # 인증서 키
        key:
          secret:
            name: prometheus-server-tls  # 인증서 시크릿 이름
            key: tls.key  # 개인 키
        clientAuthType: ""  # 클라이언트 인증 유형 (선택적)

    # TLS를 위한 포트 설정
    listenLocal: false  # 로컬 리스닝 비활성화
    externalUrl: "https://prometheus.example.com"  # 외부 URL
✅ 인증 및 권한 부여 설정
# prometheus-auth.yaml
prometheus:
  prometheusSpec:
    # 기본 인증 설정
    web:
      httpConfig:
        headers:
          X-Content-Type-Options: nosniff
          X-Frame-Options: SAMEORIGIN
          X-XSS-Protection: 1; mode=block
      basicAuth:
        username:
          name: prometheus-basic-auth
          key: username
        password:
          name: prometheus-basic-auth
          key: password
시크릿 생성:
# 기본 인증 시크릿 생성
kubectl create secret generic prometheus-basic-auth \
  --from-literal=username=admin \
  --from-literal=password=secure-password \
  -n monitoring
✅ Alertmanager 보안 설정
# alertmanager-security.yaml
alertmanager:
  alertmanagerSpec:
    web:
      httpConfig:
        headers:
          X-Content-Type-Options: nosniff
          X-Frame-Options: SAMEORIGIN
          X-XSS-Protection: 1; mode=block
      tlsConfig:
        cert:
          secret:
            name: alertmanager-tls
            key: tls.crt
        key:
          secret:
            name: alertmanager-tls
            key: tls.key

    # 보안 컨텍스트 설정
    securityContext:
      fsGroup: 2000
      runAsNonRoot: true
      runAsUser: 1000
▶️ 보안 팁: 운영 환경에서는 모든 통신에 TLS를 적용하고, 공개 엔드포인트에는 반드시 인증을 적용하세요. 또한 네트워크 정책을 통해 필요한 통신만 허용하여 공격 표면을 최소화하는 것이 좋습니다.
📌 Summary
- kube-prometheus-stack 설정 파일은 ConfigMap, Secret, CRD 등 다양한 쿠버네티스 리소스에 분산되어 있으며, Helm 차트를 통해 효과적으로 관리할 수 있습니다.
- Prometheus 설정 커스터마이징은 데이터 보존 정책, 리소스 할당, 원격 스토리지 통합 등 다양한 측면에서 가능합니다.
- Alertmanager 설정을 통해 알림 라우팅, 그룹화, 알림 템플릿 등을 구성하여 효과적인 알림 관리 시스템을 구축할 수 있습니다.
- ServiceMonitor와 PodMonitor는 쿠버네티스 환경에서 메트릭 타겟을 선언적으로 관리할 수 있는 방법을 제공합니다.
- PrometheusRule을 통해 알림 규칙과 기록 규칙을 코드로 정의하고 버전 관리할 수 있습니다.
- Grafana 설정을 커스터마이징하여 인증, 권한 관리, 데이터 소스, 대시보드 등을 구성할 수 있습니다.
- 보안 강화 설정을 통해 네트워크 정책, TLS 암호화, 인증 등을 적용하여 모니터링 스택을 안전하게 운영할 수 있습니다.